What you need to know
Major areas you should think about before beginning to work with CiviMember.
Spend some time evaluating your organization's membership structure. List the membership types your organization offers and work out how they can be modeled in CiviCRM.
In CiviMember, each membership is effectively treated as a membership of an organization. In most cases, this is membership of your organization; however it is important to understand this before you begin working with CiviMember.
Below, you'll find an outline of the relevant concepts, followed by a list of questions that will help you begin to translate your membership model into CiviMember. A note at the end of the chapter indicates other CiviCRM components you'll need to set up for CiviMember to work.
Key Concepts
Using CiviMember you will be working with these terms and concepts so it is important to understand how these concepts translate into your organization's terminology and culture.
Members, Contacts and relationships
Members are simply contacts in your database with a particular membership. The contact may be an individual, organization or some other contact sub-type, but it is always a contact: there is no separate member entity.
If you need to cancel or delete a membership, the contact will remain on the system with all other parts of their record intact. Note that you would delete a membership if you entered it in error, for example if you made Jo Smith a member instead of Joe Smith. But if Jo Smith was a member and called after 6 months wanting to end her membership, you would cancel that membership. In this case, the record of the membership would remain with the start and end date. When the record is deleted then it is completely removed.
Relationships are ways to create connections between contacts in your database. Before creating memberships, consider whether relationships might be more appropriate for your requirements. Have a look at relationships in the Contacts chapter of the Basic Set-up section to learn more about creating relationships between contacts.
Membership Types
CiviMember allows you to create various types of membership; some could be free, others paid. Different types can have different renewal rules, periods and benefits. Take some time to assess your organization's existing memberships and needs, as it's easy to over-engineer your membership structure and create more types than you actually need.
As mentioned above, CiviMember treats each membership as membership of an organization.
If you are using CiviCRM to manage memberships of several organizations or regional branches, you can set up each branch as an organization and create the membership types for each of those branches/organizations.
Your contacts can inherit membership based on relationships to other contacts.
Periods and renewals
Membership periods can be fixed or rolling. In other words, membership can always start at the same date, such as January 1, or an individual can start an annual membership that runs for exactly one calendar year. In the case of fixed dates, you can set a rollover date so that sign-ups after this date cover the following calendar year as well.
The renewal process is as important as the initial sign-up. Allow time to configure and test renewal reminder templates, especially if you have complex membership structures and want to customize messages based on member types or other factors.
Membership Status Rules
The default set of status options provided by CiviMember is:
- Pending: someone who has requested membership but has not paid, or is awaiting approval.
- New: payment has arrived, or membership has been approved.
- Current: new members move to this status after a certain period of time.
- Grace: when the end of the membership period is reached, someone who has not renewed membership enters this status for a period of time.
- Expired: when the grace period expires, the member moves to this status and no longer receives membership discounts or mailings.
- Deceased: this status keeps a deceased contact's record in the system but removes the contact from all further communications.
You can easily add to or amend these options, and you can allow any of these to count as a live membership. Some organizations like to give a 30 day grace period following membership expiry so that they can chase the member to renew, and will allow the membership to stay live during this period. Alternatively, a new membership might need approval and may not gain the member benefits until this has been given. New is really just a label for convenient separation of new memberships and renewals.
Membership payments
Memberships in CiviCRM can be free or paid, and there can be different membership fees for each individual membership type.
CiviCRM handles paid memberships by linking membership records to contribution records. A membership record documents a contact's relationship with the organization, while the corresponding financial transaction indicates the monetary value associated with that membership.
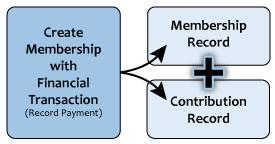
CiviCRM respects this distinction by storing the membership record under the membership tab, storing the financial record under the Contributions tab, and then creating a link between the two records.
Price sets
If your membership types have a complex price structure, you might want to consider making use of price sets.
Price sets allow you to set fee structures which include compulsory and optional elements and the ability to make some fees available only for some date ranges. You can also add negative amounts or discounts. Thus it is possible to have a different price for early bird payments or payments in different months.
Renewals
There is an important distinction between adding a new membership and renewing a membership. If someone is coming to the end of their membership life-cycle and wants to continue being a member, in most cases they should use CiviMember's renew workflow rather than creating a new membership. Membership up-sell allows contacts to change membership type as part of the renewal process.
In the renewal process, the membership record end date is extended to reflect a new membership period. For example, if your organization's membership is handled on an annual basis from January through December, an existing end date of December 31, 2010 would be extended to December 31, 2011. CiviCRM calculates the end date extension based on the configuration for the specific membership type being renewed. Note that a members' join date (or Member Since date) is not modified when a membership is renewed, so you always know when the contact first became a member.
If applicable for the membership type, a contribution (financial) is recorded as part of the renewal process. This will create a contribution record and attach it to the membership record. Each new contribution is added to the membership record.
If your payment processor supports it, CiviMember can automatically process renewal payments. Members will pre-authorize their credit card, the payment will be taken automatically, and they will receive appropriate thank-you and receipts from CiviCRM.
Over time, and after a few renewals, the membership record will be a single membership record whose end date is extended, with multiple related financial transactions representing each renewal purchase.
Key questions
Once you have understood the concepts outlined above, and before you begin to work with CiviMember, answer the following questions:
- What are your membership periods?
- Are your membership terms rolling or fixed-date?
- Is membership based on an individual, a relationship to an organization or being part of a household? For instance, a social service agency may sign up an entire family as a member, while a policy-making organization may sign up other organizations as members.
- If memberships are organizational, do staff of those organizations inherit the membership?
- Do you want to provide a special members area of your website, or offer them discounts or extra online content as a result of their membership? If so, you should explore CMS integration modules such as Drupal's CiviMember roles integration module.
- Do you want to expose self-service membership sign-up and renewal through your website?
- If your membership(s) are not free, what payment methods will you accept?
Also ask why your membership structure is the way it is. Perhaps the workflow was set up based on a previous technological or organizational limitation that doesn't apply now that you are using CiviCRM.
Other Considerations
If you will be charging for memberships, you need to review the CiviContribute chapter and in particular the section on payment processors.
Members area on your website
CiviMember can be used in conjunction with your CMS to create a members only section of your website. Drupal has integration modules that can be used to do this. A typical workflow would be that a contact creates an account on your site and becomes a member of your organization using a CiviMember membership sign up page. They then get access to extra content on your site. This extra content could be from your CMS or it could come from your CRM, for example a detailed membership directory, or a list of private events that are only available to members.
Membership set-up
There are two main things to do when configuring CiviMember. Configure your membership types, and (if necessary) configure your membership sign up and renewal pages which enable visitors to your website to sign up and renew their memberships online. If your memberships are paid, you'll also need to do some basic configuration of CiviContribute and set up a payment processor.
Membership types
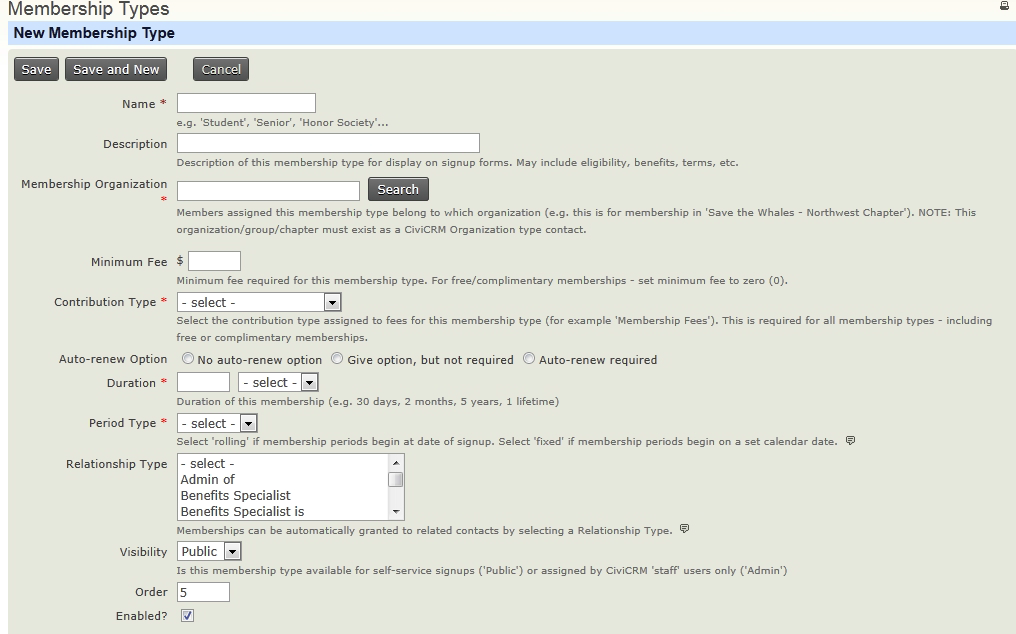
Membership types are the various membership categories that your organization offers. You can configure an unlimited number of membership types and set various options for each of them. To define your membership types, click on Administer > CiviMember > Membership Types > Add Membership Types.
The membership name is displayed throughout the system, on both public and backend pages, so it is worth choosing a good one (though you can always change it later).
A membership organization is required for each organization that the membership type will apply to. For most organizations, this will be your organization. If you want to model a membership that contains multiple organizations (including branches of organizations) you can setup the organization structure here. For example: Texas Instruments (TI) that contains TI DSEG, TI SC, TI etc. – each of the sub-organizations could inherit the core membership details from TI.
The minimum fee field is the place to enter your desired membership fee. Zero indicates a free membership.
You can choose a contribution type that the membership fee will be recorded as. By default you should probably use 'member dues' but it might make sense for you to choose a different type. This type can be overridden when recording a membership in the backend and for specific public membership sign up pages.
Auto-renew options allow you to set a membership to automatically renew. These work well when combined with payment processors that support recurring donations. You can set memberships to offer or require auto-renew. You then need to implement this option on a membership sign up and renewal page (see below).
There are two options for period type. Fixed means that the membership for all members starts at a specific point in the year. Rolling means that the membership will start on the date that the membership is entered into the system. For fixed period memberships you can also identify a rollover date: the point after which new memberships are entered as belonging to the next dues period. Note that you can override start and end dates when entering memberships manually via the backend.
Membership can be inherited from one contact to another, which is useful in situations such as one finds in professional trade organizations, where they sign up another organization as the member, but employees of the organization receive the benefits of membership. Select the Relationship Type to specify which related records should receive membership through the parent record.
You can use the visibility option to make sure certain membership types are handled by an administrator manually (e.g., honorary and lifetime memberships). When you restrict their visibility, they will not be available to add to membership signup or renewal pages on your website.
Auto renew options
If you want to offer or require auto-renew for this membership, you'll need to select the appropriate option here. Auto renew memberships can only be offered for memberships that have a period of one year or less.
At the bottom of the membership types page there is a block of information for managing renewal reminders. CiviCRM can be configured to send out a reminder email to members as the expiration date for their membership nears. This is particularly helpful for rolling membership types, where contacts may join at any time during the year. To configure the renewal reminder you must first have set up a renewal email template through Administer > CiviMail > Message Templates.
Membership status rules
Membership status rules control the journey that contacts take through the membership process. By default the path is from pending, new, current, grace, expired. To define membership status rules, click on Administer > CiviMember > Membership Status Rules.
You define a status by giving a start and end time which is based relative to either the start or end date of the membership. When updating a membership to decide which status should be applied, CiviCRM looks at each status in turn until it finds one that is valid. That is to say that it takes today’s date and sees whether it is between the start and end date for the membership status for that specific membership. If it is, it applies that status.
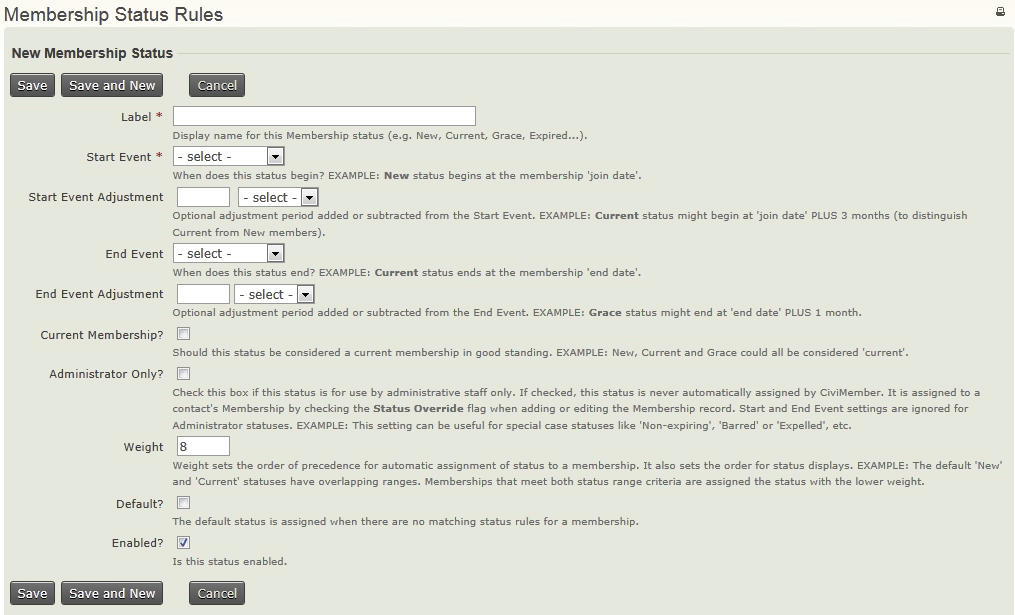
Each status has an 'is current' checkbox which you can use to specify whether the status is current or not. You could use this for a gradual end to people's memberships of 'overdue' (end date to 1 month past end date) and 'really overdue' (1 month to two months past end date) which are considered current and then 'totally overdue' which is considered not current.
Membership sign-up and renewal pages
Membership signup and renewal pages allow visitors to your website to become members of your website and to manage their own memberships. They are created using the same method as contribution pages (even if you want to create a membership page for a free membership).
CiviCRM uses the same page for new memberships as it does for renewals. The renewal page is automatically displayed at the same URL as the membership join page when viewed by a logged in website visitor that has a valid current or expired membership.
When you are setting up membership sign up pages, it is worth remembering that current members will only see the renewal page if they are logged in. If they are not logged in, they will see the “become a member” page and if they fill that page in, they will get a new membership rather than renew their existing membership. You should design your user interface to avoid this situation. A couple of ways you can do this include requiring log in to view membership signup and renewal pages, and writing text to remind people that they should log in to renew.
The first page allows you to set the title for the membership page and set some basic information like the contribution type etc. There is also a checkbox here to allow people to sign up on behalf of an organization. This is useful if you want to offer organizational memberships. Organizations can't sign up directly because CiviCRM assumes that all interaction on the website is carried out by an individual. In this case, the membership record will then be attached to the organization's record, not the individual's. You may want to force all individuals to sign up on behalf of an organization.

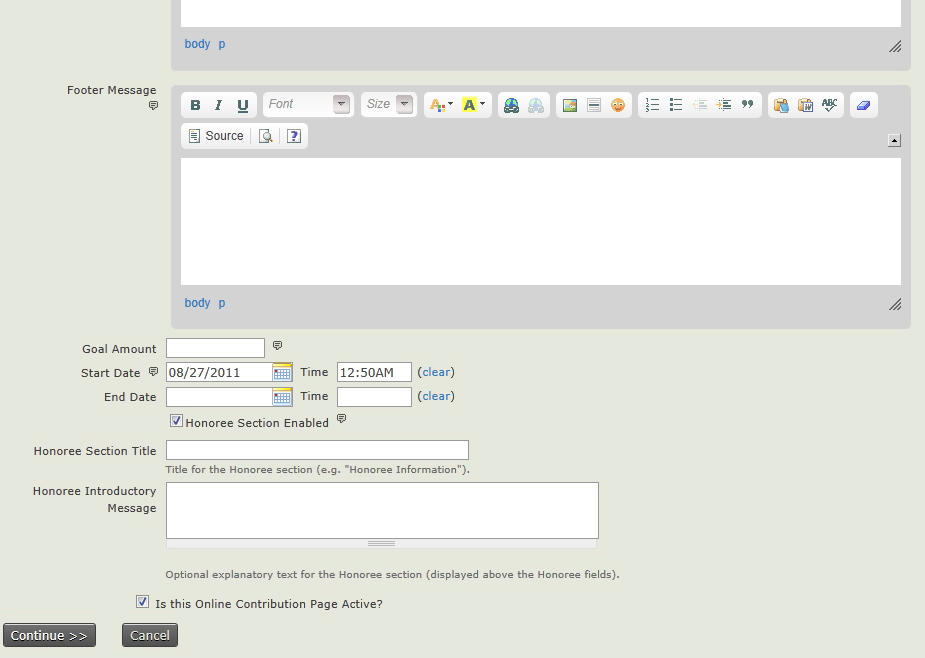
The last few fields on this form are less useful for membership sign up and renewal pages.
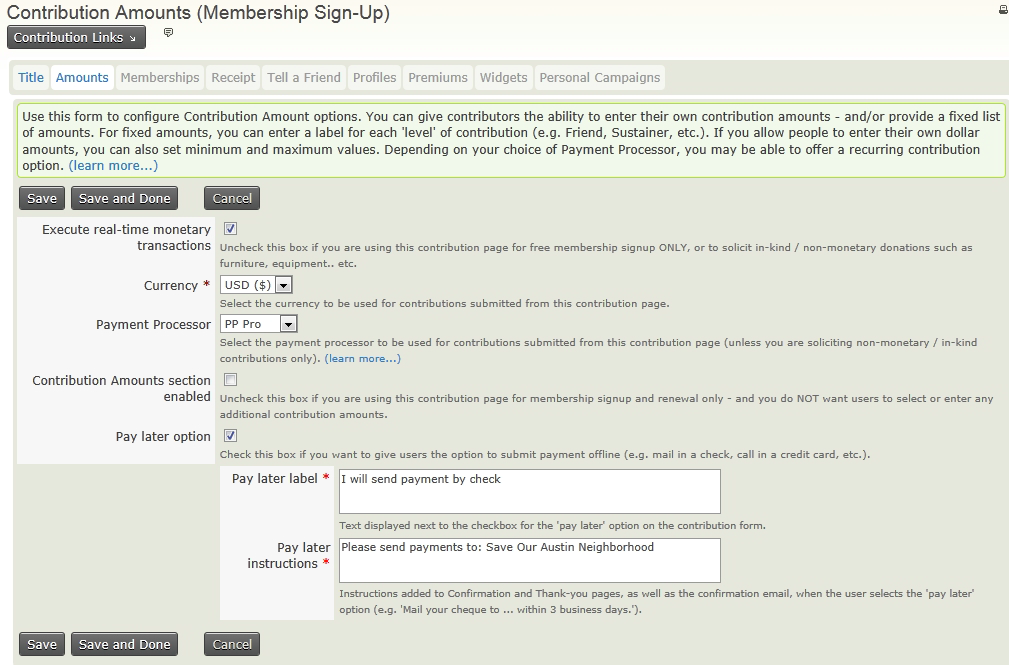
Amounts tab
This page allows you to set up the payment processor options. You'll need to select a payment processor before the next step of the wizard allows you to configure details related to the financial transactions performed through the Contribution page. If you have configured a credit card transaction payment processor in CiviCRM, you will be able to set up real-time transactions here.
If you are building a contribution page for membership signup and renewal only, consider whether you want to solicit extra contributions. If you do, leave the box checked. If you don't, uncheck it.
Memberships tab
The next step in the contribution page setup wizard is designed specifically for memberships. You should ensure that Membership Section Enabled is checked.This page allows you to set text that can be displayed for both new memberships and renewals.
Additional options that appear at the bottom of this screen. Membership Types allow you to define which memberships are available for sign-up and for up sell as part of renewal.
If you are using this online contribution page for both membership signup and general fundraising, you can make membership signup optional for constituents who just want to donate without becoming a member. If you checked the box for "Contributions Amounts section enabled" on Amounts tab to solicit additional contributions, you can decide whether such payments are recorded separately from membership fee payments.

This screen also allows you to choose which memberships are available for auto-renew (you'll need to ensure that the membership type has been set up for auto renew and that you are using a payment processor that supports automatic recurring payments.
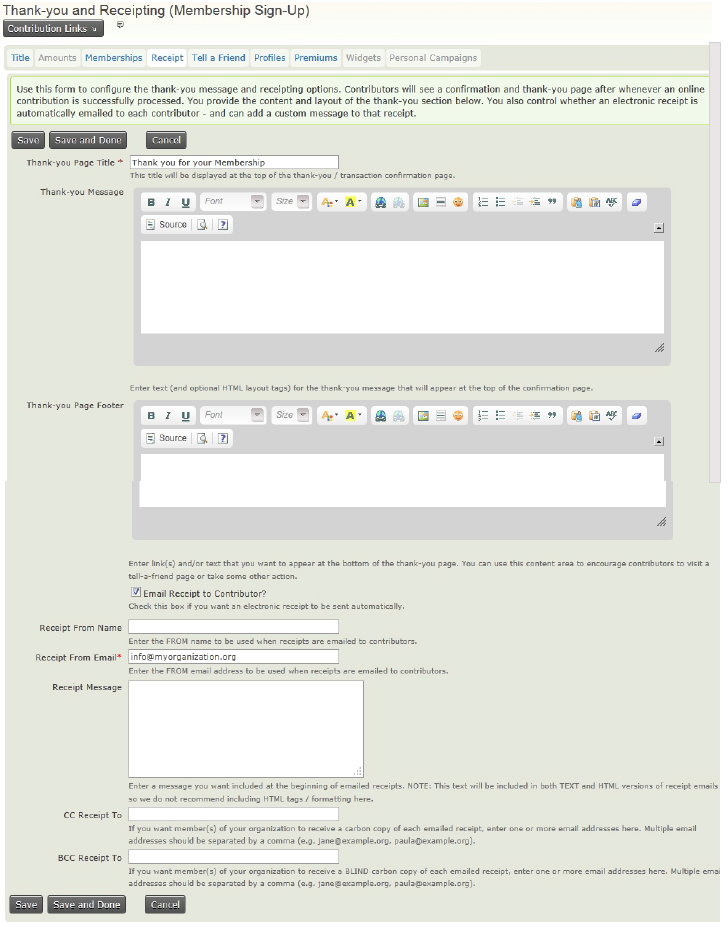
After the site visitor completes the membership signup or renewal form, he will be redirected to a thank-you page and can have an email receipt generated and sent to him. This fourth step in the wizard allows you to configure those options.
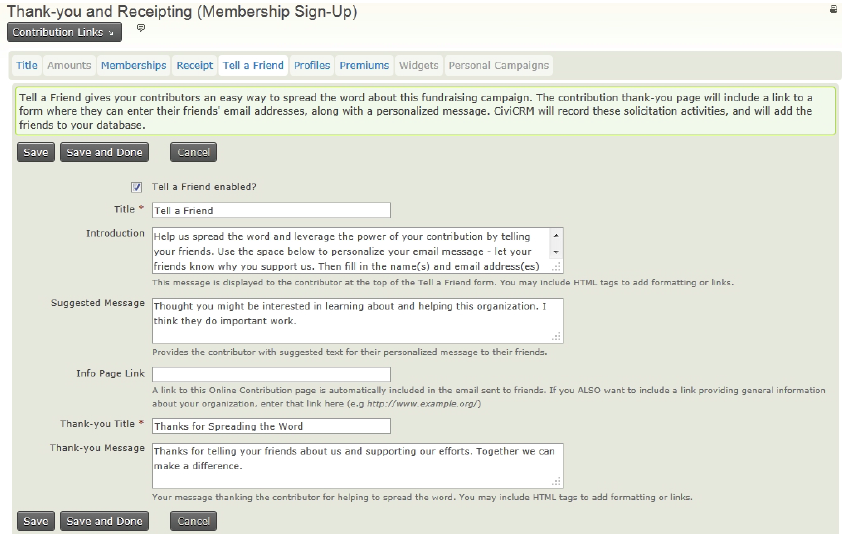
Tell-A-Friend tab
CiviCRM allows you to add a tell-a-friend feature to the thank-you page. The page lets your members share details about your organization with their friends by emailing them a link and information.
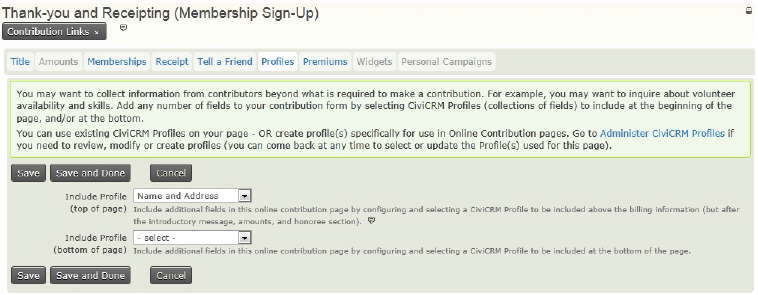
Collecting information as part of membership sign up
Profiles are central to CiviCRM's interfaces with website visitors. A profile is a collection of data fields that CiviCRM displays to obtain information from visitors or display data to them. If you are not familiar with the creation and function of profile sets you should read more about it in the Profiles chapter of the Configuration section in this book.
Profiles are critical to the functioning of membership signup and renewal pages. By default, contribution pages will include only an email field (which the member is required to fill in), in addition to the membership and contribution amount fields. Organizations almost always want to collect additional contact information as part of the membership signup process. Profiles provide these extra fields. On this step of the contribution page wizard, you may select one or more existing profiles for inclusion on the form.
If you haven't yet defined a profile with the fields whose information you want to collect, simply proceed to the next step of the wizard. Save your work on the Contribution page, define the Profile you want, and come back to the Contribution page to assign the profile.
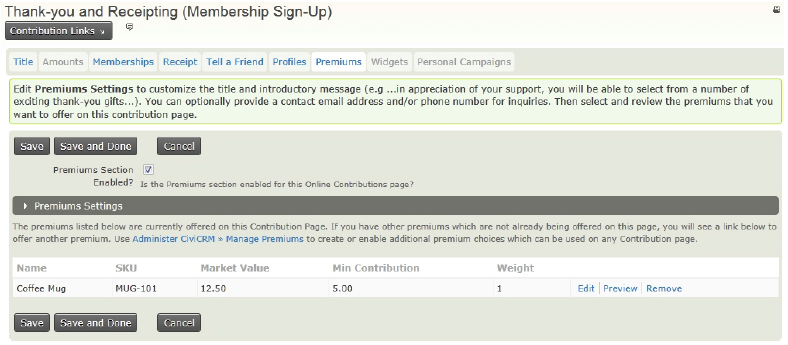
Premiums tab
Premiums are thank you gifts and incentives offered to organization contributors. They are most commonly associated with tiered donation levels, though they could be created for use with memberships. Before including premiums on a contribution page, you must configure them through Contributions > Premiums (Thank-you Gifts).
The Premiums tab of the contribution page wizard controls the introductory text, contact information, and other premium-related details.
Contribution widgets is used for displaying fundraising goals, so Widgets are usually not used for membership pages. Personal Campaign Pages are geared toward obtaining help from visitors toward fundraising efforts, so Personal Campaign pages are usually not used for membership pages.
Test drive your membership sign-up/renewal page
Once you finish configuring and setting up the details of your event, you are well advised to test drive the event to make sure all the pieces of the event process are working according to your expectations: Contributions > Manage Contribution Pages > click Links next to your membership sign-up/renewal page > click Test-drive.
You may want to test the following:
- Do the description of the event, dates, cost of the event, etc., make sense and match your organization's plans?
- Are the messages that confirm the registration clear?
- Did you receive the email message that confirms and thanks you for registering?
- If it's a paid event, did payment processing work?
Test the event through the eyes of a person who is registering for the event, to make sure the flow of the registration process guides the person effortlessly each step of the way. After initial testing, if you send your invitation email to a person in the organization that hasn't been directly involved in the configuration of the event, you can get a fresh point of view that represents what your contacts will feel during the process.
When using the Test-drive Registration option, you see the same registration pages as a regular user, but the online payment isn't really debited from your card (and you can enter a fake one).
Publishing your membership sign-up/renewal page
After completing the contribution page wizard, return to the listing of Contribution pages, where you will find the page you've just created: Contributions > Manage Contribution Pages. You can now view the page, test the functionality, or return to the configuration options and make adjustments.
At this point you've completed the Contribution page but have not made it visible or available to website visitors. Depending on the environment in which CiviCRM is operating, this will be accomplished in different ways.
- Drupal: Contributions > Manage Contribution Pages > click Links next to your membership sign-up/renewal page > click Live Page to view the finished page. You can then copy the URL and include it in a content page or assign it to a menu item.
Everyday tasks
This chapter will describe some of the everyday tasks to help you create, edit, renew, and manage your memberships.
Managing Memberships
To see a summary of the status of your memberships over recent months, as well as a details about these memberships, you can use the membership dashboard or or view the membership in an individual's contact record.
The Membership Dashboard
To see a quick snapshot of your recent memberships, use the membership dashboard: Memberhips > Dashboard. This screen contains two blocks of information that display a summary or your recent memberships, categorised by type and date range, and a list of recent member activity.

All of the summary numbers are hot-linked. Simply click on a number to drill down and view a list of members who have joined or renewed over the last two months or the year-to-date, or who are considered current according to the membership status definitions. From this list of members, you can perform additional actions with the memberships, such as Delete, Edit, Export, Send Email to Contacts.
Viewing An Individual's Membership Records
Another way to view membership records is by viewing an specific individual's record and looking at the Membership tab:
- After finding the contact you wish to manage, click the "Membership" tab to view a summary of the contact's membership records.
Membership records appear in a list with active memberships (those with a current status) first and followed by expired or canceled memberships.
You can edit existing membership records, renew a membership, or create a new membership record. If you have configured an online credit card payment processor for use in CiviCRM, you will see two options for creating or renewing a membership: one for handling an offline record (no real-time transaction taking place), and one for handling an online record (using a real-time credit card transaction). The interface for each process is very similar, except that the credit card option includes payment processing and recording options.
Creating a New Membership
To create a new membership record, you can:
- Find the contact, then click on the Membership tab > Add New Membership, then fill out the "New Membership" form, OR
- Click Memberships > New Membership, then select the contact or create a new contact who will be getting the membership, then fill out the "New Member" form
Reports and analysis
There are a number of techniques for reporting on and analyzing your memberships. The membership dashboard gives a quick overview of your current membership, with rows for each membership type and columns that current totals, and year and month to date figures.
That's a good start but there are a couple of ways that you can create more detailed and customised analysis using CiviCRM's search features and CiviReport.
If you are interested in the financial aspects of membership, you may also find the reports and analysis chapter in contributions useful.
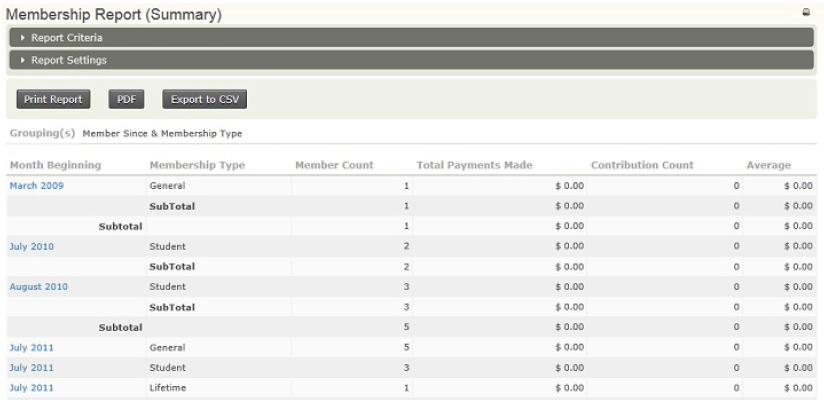
Membership reports
Out of the box, CiviCRM comes with three membership reports designed to tell you something specific about your membership.
The membership report (detail) shows a line for each member. The membership report (summary) shows members grouped by any criteria you specify. For example, you can look at the amount of members that have joined each year for the last 10 years or show members broken down by country of origin or any other custom data that you collect on them. Clicking on any row in the summary report will take you to the a corresponding detail report for that row. The membership report (lapsed) provides a list of memberships that lapsed or will lapse before the date you specify.
Searching based on membership data
CiviCRM makes an important distinction between contacts and memberships, which is blurred when we talking about 'members'. Consider the following question: 'How many members do we have?' This could be taken to mean 'how many contacts do we have that are members?', or 'how many memberships have we granted to contacts?'. The answer to these questions is often be the same but what happens if one of your contacts has more than one membership? The answer is that you'll have two memberships but only one contact.
There's no right or wrong answer to the question should we look at contacts or memberships. It just depends on what you are interested in. It is important to take this into consideration when carrying out a search.
The Find members search allows you to search based on membership data and return membership data. The Advanced search allows you to search based on some limited membership information (and combine that with other contact information) and return contacts. You can also choose membership from the Display Results As column to show members rather than contacts.
Searching based on criteria gives you access to simple totals and also the option to export as CSV for further analysis.
Further analysis
If CiviReport and the contact and membership searches aren't giving you want you want, consider commissioning a new report or custom search. Read the CiviReport section and the 'Search and actions' chapter for more information.
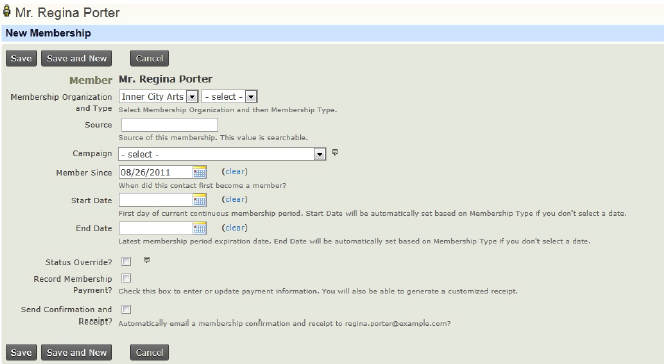
Many of the fields on this page will be auto-completed if left blank. Fields include:
- Membership Organization and Type: select the name of the organization that the contact has a membership with and the type of membership.
- Source: The system will complete details regarding the record, including whether it was an offline or online transaction and who completed the record.Status Override
- Campaign: if the membership is connected with a larger campaign, select the name of the campaign. To learn more, see the section on "Campaigns".
- Member Since: The date the membership record was created will be auto-filled, but you can edit this date with the actual date that the member joined.
- Start Date: If the membership type is a rolling membership, the current date will be auto-filled. If the membership type is a fixed period, CiviCRM will determine the appropriate start date based on the membership type configuration.
- End Date: This field is automatically calculated from the start date and filled in based on the membership type settings.
- Status Override?: check this box to manually define a status for the membership record. As indicated by the title, it overrides the status automatically provided. You should use caution with this field as setting it will disable the automated status function for the record.
- Record Membership Payment?: By checking the box and completing the transaction fields displayed, you are creating two associated records: a membership record and a contribution record. After recording the membership, you will be able to view the membership record and see the related contribution record at the bottom.
- Send Confirmation and Receipt?: check this box to send an email to the contact that their membership is confirmed
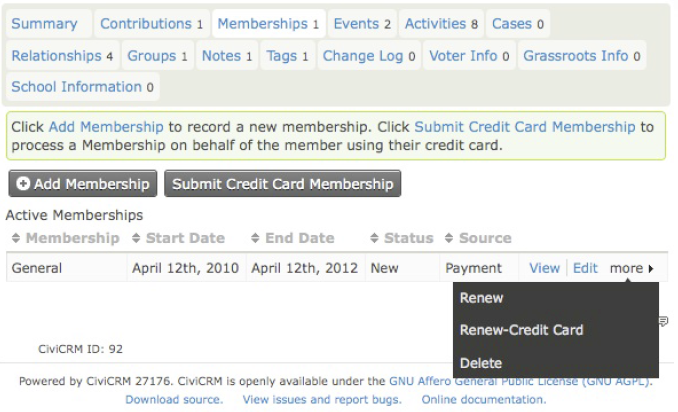
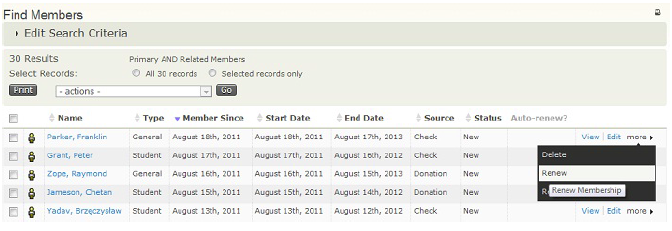
Renewing memberships
Naturally, you expect your constituents not only to join your organization, but to maintain their membership on an ongoing basis through renewals. CiviCRM facilitates the renewal process: Search for the contact > click on the "Membership" tab > click MORE next to the membership record to renew > Renew.
Batch updating memberships
You can batch update membership records by selecting Memberships > Find Members > enter your criteria and from the "Find Members" results screen, select the membership records and click Batch update. You'll need to
Canceling, expiring and deleting memberships
If a contact wants to resign or cancel their membership, rather than deleting their membership, you should change the status to cancelled or another status that is not considered current. This ensures that you keep a historical record on the contacts interaction with your Organization.
You may want to delete a membership record if you accidently created a membership for the wrong contact. The contact is not deleted, only the membership record is deleted. This action cannot be undone.
You can delete membership records by:
- Searching for a particular contact, then click on the "Membership" tab > click Morenext to the membership record > click Delete, OR
- Click on Memberships > Find Members > enter your criteria and from the "Find Members" results screen, select the membership records and click Delete.
Exporting membership records
You may decide to export membership records so that you can do more analysis, perform document mail merges, or create a specific type of report outside of CiviCRM. Exporting membership records allows you to select a default set of primary fields or choose fields that are specific to the membership record for export.
To export membership records:
- Click on Memberships > Find Members > enter your criteria,
- then on the "Find Members" search results screen, select the records you want to import and in -actions- drop down, select Send Email to Contacts.
What is CiviMail
The CiviMail component extends CiviCRM's core email functionality with sophisticated tools for handling mass email campaigns. It can reliably deliver a high volume of email and provide detailed reports on the results and effectiveness of those emails. CiviMail is often used to complement other CiviCRM components, for example to send emails to non members to encourage them to become members or to send emails to people that are yet to register for an event.
CiviCRM's mail features, including CiviMail, interact with your mail server software. Configuring the mail server and CiviMail are system administrator tasks, which may require professional assistance. You will also need to verify with your web hosting provider whether they meet the configuration requirements, and verify that they don't put limits you might exceed on the number of emails you can send per day.
Scenario: Peace centre
St Egeltina's Centre for Peace and Reconciliation use CiviEvent to run a yearly event programme on a number of different themes. They have set up a mailing list page where people can sign up to be informed of all events only events that interest them. They then use CiviMail to send out emails to those people based on those events. When someone unsubscribes from an event theme mailing list, CiviCRM keeps a record of the fact that they have unsubscribed.
St Egeltina's also automatically subscribe anyone who has been to an event on a specific theme to receive emails about that theme. They don't have to worry about spamming people that have unsubscribed from a thematic event mailing list, as CiviCRM will remember that they have unsubscribed and not re-subscribe them.
From time to time, St. Egeltina's send out other emails to a mailing list that includes nearly all contacts on their database with personal messages from the centre director highlighting particular issues. Often two similar versions of the same email are sent to different groups in their database to test which message formats are more effective. They can do this by sending the email to half the contacts in a particular group and then sending another email which excludes contacts that have already received the first email.
Scenario: mobilizing with email
The Townsville Organization For Tenants (TOFT) held a survey and petition to gather data and support for the campaign Demand Affordable Public Housing. The survey was undertaken by volunteers visiting selected constituents in their homes while the petition was widely promoted to the public who could sign and answer questions online.
In the early stages of the campaign, the TOFT volunteer coordinator searched for contacts in the group Volunteers and used the Send email action to send a general email asking for volunteers to help with the survey. From those who responded that they were available, a small group were trained to carry out the home visits and record survey responses.
Once the online petition had been created using tools in CiviCampaign, the TOFT communications officer created an email including text, images and links to promote the campaign and encourage people to click through to the site and complete the online petition. This email was then sent out to the entire database using CiviMail, including a forwarding link so that recipients could easily distribute the email widely through their own networks.
CiviMail enabled TOFT to track responses to this mass emailing; reports were generated showing that 89% of recipients clicked through to sign the petition, and 75% forwarded it on to others. This data was then compared with previous offline petition and survey efforts to demonstrate the increased reach of the campaign through using CiviCRM.
What You Need To Know
This chapter outlines some key concepts and questions that are useful for planning the use of CiviCRM's email capabilities. This chapter should be read before you start sending emails to contacts.
Key Concepts
As you might expect for a web-based CRM, email plays a central role in CiviCRM. Broadly speaking, there are three situations in which email is sent from CiviCRM:
- as part of workflows that happen in other components, for example, an event registration confirmation email
- to individuals and small groups of people (via the Send email action)
- as a mass mailing via CiviMail.
A substantial part of this section deals with CiviMail, but it will also be useful if you are using other components of CiviCRM that interact with email without enabling CiviMail.
Every email sent, via the Send email action or using CiviMail, is treated as an activity and stored in the activity history of each recipient so you can see, for example, that John Doe made a donation three days after he received your April newsletter.
Send email and CiviMail
When the CiviMail component is enabled, CiviCRM offers two options for sending email to contacts:
- send an email as an activity for a contact: this is suitable for sending emails to individuals and small groups
- send a Mailing to a group using CiviMail: this is ideal for mass mailings or scheduled emails to small groups.
There are crucial differences between the Send email action and the CiviMail component:
- emails sent via the Send email action are limited to a maximum of 50 email addresses, and there is no reporting other than an activity record for each recipient
- CiviMail emails have sophisticated bounce processing and reporting
- CiviMail allows recipients to manage their own subscriptions
- CiviMail can be configured to automatically track replies.
CiviMail requires more work to configure and there are more steps involved in sending each email than using the core email functionality within CiviCRM; however, once you have enabled and configured CiviMail you will have greatly enhanced mass email capabilities.
Working out which method to use for each email might not be immediately apparent. Over time, the best practices and the right tool for each situation will become more obvious and can be shared among your users.
When to use the Send email action
The advantage of sending emails to your contacts via CiviCRM is that each email is recorded as an activity with a contact, allowing other staff members to easily determine whether a contact was sent a particular message. It is also a quicker option than setting up a mass mailing as long as you are contacting fewer than 50 recipients.
The Send email activity offers all the functionality of an email client: you can attach files, CC and BCC contacts, and use message templates. This option is available even when the CiviMail component is disabled.
Note that CiviCRM is not suitable for conducting extended email exchanges. For those, you need to use your regular email client. If you want to record the fact that you had an email exchange with somebody, you could create an activity called Email Exchange and copy and paste your email conversation in the body as you would a record of a telephone call. You can also use the Autofiling outbound email option described below.
You can record this Send an email activity for multiple contacts at one time. However, it is recommended that you use CiviMail's Scheduled Mailing tool if you want to message more than about 50 contacts to avoid having your email marked as spam.
When to use CiviMail Mailings
Mass mailings to groups of contacts should always be sent using the Mailings tool provided by the CiviMail component. This will enable you capture statistics about the success of your mailing, including bounce statistics and click-throughs. CiviMail will also ensure that a mailing to a large group does not overwhelm your email server, and lets you set up a specific automatic response to each mailing.
Choosing recipients
Both methods of sending email have two options for choosing recipients: one from the tool's interface and the other based on search results.
- Sending an email as an activity allows you to choose recipients after you start the mailing, as you would in a regular email client. You can choose direct recipients and recipients marked as CC or BCC. It is also possible to send email to recipients chosen based on search results, as long as there are fewer than 50.
- Mass mailings can only be sent to groups marked as Mailing Lists, which must be created prior to sending an email. (Read more in the Tags & Groups chapter). It is possible to send a mass Mailing to contacts based on search results, but CiviCRM will create a special group for each such mailing.
Tokens and personalisation
Tokens can be used to insert personalised text, such as a person's name, into an email. Tokens are placeholders that CiviCRM recognizes and replaces with an appropriate value when sending each message. The list of tokens available to you will include tokens for custom data fields that you may have created for individual data, such as gender or ethnicity. Note that not all tokens available in CiviMail are also available in the Send email activity.
You can include a direct link to the person's contact dashboard so that they can review their registration details after logging in, or you can use the checksum token to allow them to edit a specific profile or submit a contribution without logging in.
See more details about Tokens in the Tokens and Mail Merge chapter in the Working with Your Data section.
From Email addresses
Both mass and regular email can be sent from your personal address, from a general email address associated with your organisation, or from another person's address. For example, an assistant can send official email messages under the name of his manager.
Headers & Footers
In mass mailings only, you can include customised headers and footers. You can configure custome headers and footers under Administer > CiviMail > Headers, Footers, and Automated Messages.
Unsubscribing
CiviCRM requires that you allow recipients to unsubscribe from any mailing list and opt out of ever getting email from you. See the chapter on Set-up to learn how to easily include an unsubscribe link in each mailing.
Templates
Templates for emails or parts of emails help to streamline your communications by reusing entire emails or parts of emails such as headers and footers. Email templates can be created either beforehand or when you send an email, and edited at any time.
Reporting
CiviMail can track mass mailings, providing useful information to help you understand the areas your recipients are interested in and gauge the effectiveness of your communications. You can track how many recipients opened the email and which links in the email were popular.
A word of warning about email opening statistics: CiviMail tracks the opening of a message by inserting an invisible image in the body of the email. The majority of email clients have the display of images disabled by default and unless the user chooses to display images, their email will not be recorded as opened. You will therefore definitely have more readers than the number reported. In our experience, a 30% reported opening rate can be considered good. This is obviously different for each organisation and each group you send emails to.
Don't focus too much on the absolute numbers, but rather use them as a way of comparing different mailings you send. You might want to use them to experiment with different layouts, writing styles, and lengths and see what works best for your constituents.
Autofiling external emails in CiviCRM
CiviCRM lets you file email sent via your email client against contacts in your database. You need to set up a special email address that you include in the BCC field of an email you are sending. This will be read by the database and converted into an activity. This activity gets filed in the record of the contact that matches the email address. If that email address does not exist in your database a new contact record will be created. See the Set-up chapter for details.
Key Questions
- For a given message, do you need to send it to more than 50 contacts?
- Does your organisation send out regular email newsletters?
- Have you created a list (a Group or Smart Group) to which to send your email?
- Do you want to know who is opening your email and clicking on links in it?
- Will you want to track replies to your mass mailing?
- Do you want recipients to be able to view your mailing in a browser window if they have trouble viewing it from their email browser?
- Who should be the sender of the email? This could be a generic organisation address, or personalised with someone's name.
- Is there content you'd like to include in the header and/or footer in every mailing?
- Would you like to allow people to sign up for your newsletter online?
- Would it be useful to create standardized email templates that can be used again and again for newsletters and the like?
Other Considerations
Many CiviCRM components interact with email functionality and with CiviMail, for example to send confirmation, thank-you and receipting emails. The sections of this book relating to each component will include some information about customising these emails, and should be read in conjunction with this section in order to give you a full understanding of how email works in the broader context of CiviCRM.
Privacy Issues
We encourage you to consider privacy issues. Different countries have different laws relating to email privacy, including opt out/unsubscribe options. There may also be issues related to CiviMail's tracking tools; for instance, you may wish to avoid tracking who has clicked on the "how to deal with drug issues" link on a specific mailing.
Set Up
This chapter describes how to set up information such as from email addresses, mailing groups and email templates. It assumes that the basic functionality necessary for your server to send and process emails in the first place has already been configured. See "System Configuration" for details.
Configuring the domain information
Your domain information is basic information about your organization: name, a short description, your email address and your physical postal address. CiviMail requires that you include the sender's physical address along with unsubscribe/optout links in any mass mailing you send, in order to comply with privacy laws in many countries. This information is made available via tokens and must be included in any mail sent with CiviMail.
To configure the domain information, go to: Administer > Configure > Domain Information.
Mailing groups
CiviMail uses Groups to draw in recipients of mass mailings. To create a group, go to:Contacts > New Group. When you create and configure a Group for this purpose, make sure to check Mailing List so that it is available as a Mailing List in CiviMail.
You can also create Smart Groups based on search results. For example, based on the results of Advanced Search you can create a Smart Group of contacts who have active memberships, or a Smart Group of contacts in a given city. The Smart Group membership will always match the search criteria at any given moment. This makes it possible to to send mailings without having to first update the contacts in a group.
To create a Smart Group:
- Go to Advanced Search or Find Contact and run a search query based on the criteria for your group.
- On the search results page, click the radio button that selects all the records.
- Click on – more actions –, select New Smart Group and then click Go.
- The next screen provides a review of the criteria chosen for the Smart Group. Give the Smart Group a name and (optionally) a description, and make the Smart Group a Mailing List.
- Click Save Smart Group.
Note: You can also create a Smart Group based on a Participant search. However, the Smart Group save page will not offer you the option to make this group a Mailing List. To make this Smart Group available to CiviMail, you must change its settings through Contacts > Manage Groups. This same thing happens if you use the Advanced Search and choose Event Participants under "Display results as" .
You cannot create smart groups based on Membership, Contributions or Pledge searches. This apply to results of an Advanced Search if the "Display results as" option is set to anything but Contacts.
Allow people to sign up for your mailing lists online
CiviCRM makes it possible for people to sign themselves up to mailing lists online. To do this, you must designate the group as a mailing list.
Go to Contacts > Manage Groups. Click Settings on the group that holds your mailing list recipients and check Mailing List. You must also change the Visibility to Public Pages.
This will be any Group of the Mailing List type with visibility set to Public Pages. For this to work for users who don't have a log-in to your CiviCRM, you must ensure that anonymous users in Drupal have the following permission checked: "Access CiviMail subscribe/unsubscribe pages".
You and anyone who accesses the following link can subscribe to these mailing list groups: www.yourdomain.org/civicrm/mailing/subscribe. This is one way that users can subscribe to an email list online.
After people subscribe to groups on this page, they will be sent an email asking them to confirm their subscription and their details will appear in CiviCRM with their group subscription set to Pending. When they click the confirmation link in the email, their group subscription will be set to Added. Note: When users subscribe to multiple groups at once, an confirmation email is sent for each group separately.
Alternately, you can collect more information while people sign up to your mailing lists with the use of profiles.
To do this, you must designate each group that you want people to be able to sign up for as a mailing list.
Go to Contacts > Manage Groups. Click Settings on the group that holds your mailing list recipients and check Mailing List. You must also change the Visibility to Public Pages.
You must then set up a profile. For additional information on how to do this, see the Profiles chapter.
For example, you could create a new profile called Newsletter Sign-up. Add the fields to this profile that you'd like website visitors who want to join your mailing list to fill out. Each of the fields in the profile must have a Visibility of Public Pages. For example, you may want to collect First Name, Last Name, and zip code or post code. For each of these fields, you must decide what information you require and what is optional.
At the very least, this profile must include an email field that has the Required? checkbox checked. This is so that an email can be sent to the person to confirm that they wanted to sign up for the mailing list. Until they confirm, they will have a status of "Pending" in the mailing list group.
You must add a field for the mailing lists groups that you want them to be able to sign up for. Do the following:
Click Add Field. For Field Name, select Contacts. When the possible selections load in the second field, select Group(s). In Field Label, you can leave "Group(s)" or you may want to change it to something more intuitive to your website visitors such as "Newsletter Sign-up". Visibility for this field must also be set to Public Pages.
To allow people to actually use this form, you can either share a link directly or embed this set of fields in your website as a form. Return to the listing of profiles and click More to the far right of your profile. Click Use Profile-Create Mode. The link you want will appear in a new window or tab. You can this link to allow users to sign up for your mailing lists.
Alternately, you can embed this set of fields as a form in your website. Navigate toProfiles from the Administration menu and click More. Select HTML Form Snippet. Copy and paste the contents of the window that appears into a page on your website. Website visitors will be able to sign up to your website on this page.
Creating and maintaining message templates
The easiest way to create a new message template is to check the "Save as New Template" on the message creation screen. This is available both when using "Send an email" as activity and sending a mass mailing.
You can create message templates from scratch or edit existing templates by going to Administer > Configure > Message Templates OR Administer > CiviMail > Message Templates.
- Click on New Message Template.
- Enter a Message Title and a Message Subject. You can choose to use tokens to personalize your subject line.
- Scroll down to the HTML Message section and create your template. There are online resources that offer instructions on creating an HTML Email Template. One suggestion is to find and copy an Email Template from a website that offers samples.
- One of the toolbar buttons at the top of this section lets you view the source code of your template. When you click on it, the template changes the view to show the HTML code that is being used. If you want to use HTML from a template you found externally, you need to switch to this view in order to paste in HTML code from the template. Make structural changes in your template in this mode as well.
Message templates are available even when CiviMail is disabled.
Tips for creating templates
HTML code allowed in emails is more restricted than HTML used for web pages. For instance, it needs to use tables for layout, inline CSS and must not include background images. Here are some tips for creating a template that will look good in all mail clients:
- Table border: The HTML <table> element includes an optional border attribute. Since the default value is 0, it doesn't appear unless you choose to use it. Adding it (or editing it if it is available) and setting it to 1 (e.g., <table border="1">) allows you to see the edges of your table and helps identify potential places to fix problems. Please note that HTML email templates usually have multiple tables and nested tables (tables inside tables). Make changes one at a time and switch to the HTML view to see the results. A table usually has more than one parameter, so make sure to place spaces between parameters.
- Table cellpadding and cellspacing: these table parameters are very useful when trying to improve the readability of your email. Play with these settings in different tables and see what works for you.
- Width: Do not send an email that is wider than 600 pixels, to ensure maximum compatibility across email clients. Make sure your outermost table does not exceed 600 pixels. Do the same for any other tables inside your main table. Also make sure that the total width of each image does not exceed 600 pixels. Images have a width parameter, but they can also have a horizontal padding parameter that, if set, can increase the width of the image.
- Images: these need to be online and accessible in order for you to use them. First edit your image so that its width and height is appropriate for your email template. Next save it so that its file size is as small as possible. If you do not have image editing software, or do not know how to use it, there are free online resources that can help you resize your image.
Creating headers and footers
Headers and footers are only available for mass mailings using CiviMail. This functionality is only available when CiviMail is enabled.
The mail header is the area at the top of the email, which should include elements that you want to be always displayed before the main content body, such as the logo of your organization and the title of the newsletter.
The default footer, which is always the last thing in the email. The footer is an ideal place for the compulsory unsubscribe tokens.
You can manage headers and footers in Administer > CiviMail > Headers, Footers, and Automated Messages. Style them to present a coherent visual identity across all your messages. Both should be configured for maximum flexibility. For example, one or more headers can be created with different images and titles that can be used for different campaigns or programs.
After headers and footers are configured, staff who prepare a new mailing will be able to select them from available headers and footers. This helps staff create more standardized mailings with elements that help your readers identify the contents of the mailing or find information.
Testing templates
Once your templates are ready, we strongly recommend that you test them in various email clients, such as Mozilla Thunderbird, MS Outlook, Mac Mail and web-based e-mail such as Gmail, Yahoo and Hotmail. You can create a group that includes a test contact for each of those destinations and use it each time you create a new mailing.
Because email clients can display the HTML in emall very differently, we recommended that you keep the HTML as simple as possible and use only inline CSS or tables for formatting. Include as much of the layout as possible in the templates so that each new mailing will not require too much reviewing, the template having already been tested.
Plain text and HTML format
All messages can be sent either in plain text or in HTML. Today the vast majority of people can read messages received in HTML. However, the best practice is to offer the option to send a Plain text email version to ensure all recipients can view the message. Plain text email readers may display HTML email as blank. HTML email may also present accessibility issues to people using screen readers.
However, there is a danger that if users modify an email based on a template that contains both Plain Text and HTML, they will forget to modify the Plain Text version of this message. This will mean that people using Plain Text only email clients will receive a different message.
The solution is to either use Plain Text emails only or to set templates without the Plain text option and ask users to create a Plain Text version before sending mailings.
To create a plain text version of a message from HTML, follow these steps:
- Copy HTML text into the Plain Text field
- Copy the URLs of all links in the appropriate places in the Plain Text field
- If the HTML text contained tables, modify the layout to ensure text is readable
Uploading Images
Please note for Drupal installations of CiviCRM only:
Using Drupal Default Editor along with an IMCE WYSIWYG profile is currently the only way to allow users to browse, upload and otherwise manage files on your server for use with mailings, event descriptions, etc.
To be able to upload images into the CiviMail text editor, it's necessary to first enable a Drupal module called CiviCRM IMCE. To do this, you'll need to install IMCE and IMCE WYSIWYG bridge. See the README file in IMCE WYSIWYG bridge for installation instructions.
Once you have installed CiviCRM IMCE, you can then enable it in the following way:
Go to Administer > Modules. Check the box "CiviCRM IMCE".
Auto-filing email conversations in CiviCRM
You can set up automatic filing of your inbound and outbound emails that are in your usual email program. They get filed as an activity for the contact(s) that match the email addresses in the From, To, and Cc fields. If the email address is not already in the system, a new contact record will be created.
For this, your administrator should have configured IMAP or other mail accounts and set them up in CiviMail (see Email System Configuration in Basic Setup for more details).
Everyday Tasks
This chapter contains step-by-step instructions for performing important everyday tasks with email.
Send an email to one person (with CC and BCC)
You can use CiviCRM to send an email to individuals. Using CiviCRM for this purpose is useful if you want other people at your organisation to see the email or if you want to send an email based on a pre-defined template.
- Find the person you wish to email. There are two common ways to do this:
- Use the Quick Search box on the top left. Click inside the box and begin typing a part of the person's name or email address. Choose the person from the choices that are presented.
- Navigate to Search > Find Contact. Enter part of the person's name or email address. Click Search and click on the person's name when it shows up on the search results screen.
- From the contact summary page, click Actions > New Activity > Send an email.
- You can add additional recipients using the CC and BCC fields.
- If you have templates defined, you can choose one to use for this email. Selecting a template populates the text content and HTML content fields with the message content from the particular template you have chosen. You can then edit that content. You can also update the template, either changing the original template or saving it as a new template.
Note: Choosing a template overwrites any text you have in the message text area and on the subject line. If you would like to add a template to an existing message, it is best to insert the template first. If you have already typed some text in the message area, copy it into a separate document before applying a template.
- Enter a subject line for your email, or modify the subject from the selected template as necessary.
- If you just wish to send a Plain Text version of your email, ignore the HTML section and click on the Plain Text section. Enter your message in the box.
- Click Send to send your message.
To see the activity that was just recorded of the email sent, click the Activities tab of the contact.
Sending a quick email to less than 50 contacts
In the results from a search, CiviCRM makes "Send an email" available from the actions dropdown menu. This allows you to send an email to more than one contact at a time. Sending an email this way is relatively quick but provides no options for tracking email and doesn't give contacts the option to opt out. It is bad practice to use this method for mass mailings, which is why it is limited to 50 contacts. For mass mailings, use CiviMail.
- Click Search > Find Contacts (Advanced Search). Choose your search criteria and click Search (or use any other search to find the contacts that you wish to email).
- From the search results screen, choose some or all of the contacts and click – actions – > Send Email to Contacts.
- Follow the same steps as in sending an email to one person.
Each of the recipient contacts will have this email recorded as an activity activity. An activity will also be recorded for the sender. The acitivity record will also list all the other message recipients. Unlike with mass mailing (see below) there is no one place where all emails sent via CiviCRM are listed.
Note: If a message is sent to multiple recipients, each recipient will only see their email address (equivalent to sending via BCC).
Because the recipients don't see who else received the email, you might want to mention whom you are sending it to in the text of your mail (for instance: "TO: Members of the board, staff")
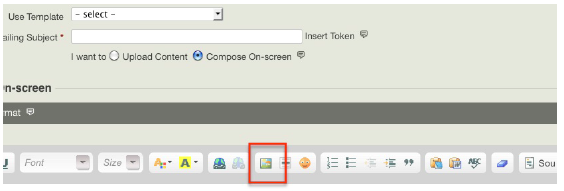
Inserting an Image in an Email
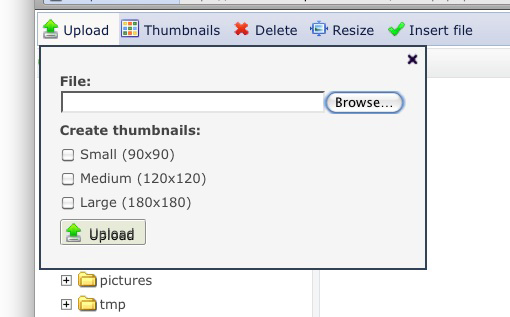
You can include images in your emails using the image button in the text editor. (See the chapter on Set-up for important information about inserting images in Drupal installations.)
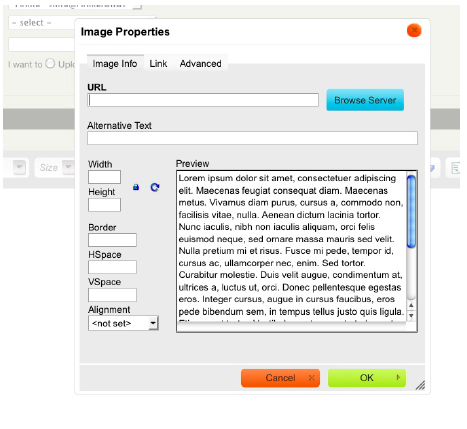
Use the pop-up window to browse to the image you'd like to upload. Click Browse Server.
You should see a directory of files. Click Upload.
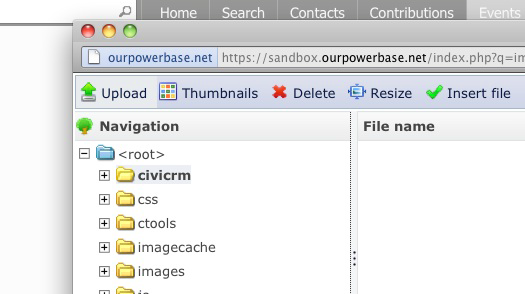
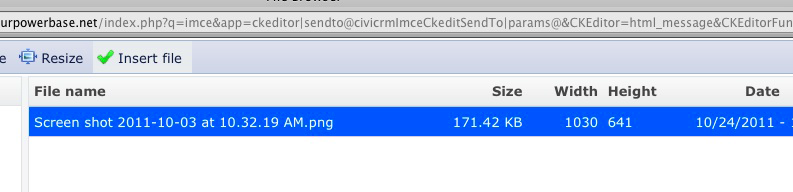
The File Browser will appear to let you browse your images. Click Browse to access your files and navigate to the image that you want to upload.
Click the image to select it and click Open. The path to the image will appear in the browse field. Click Upload. You can repeat this process to upload multiple files to CiviCRM at once.
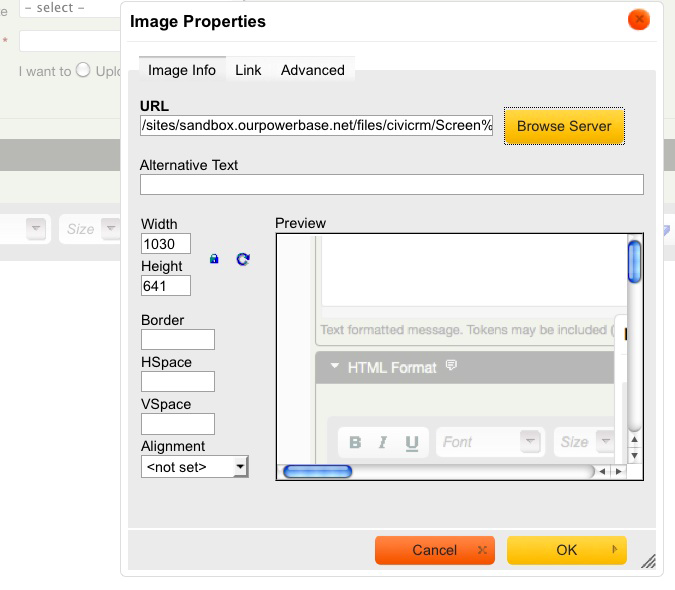
To insert the uploaded images, select the desired file and click Insert File. You'll return to the Insert Image window of CiviMail. Here you can adjust image alt text, size, and alignment.
Note: It's a best practice to always include alt text for images to make email accessible to all user communities.
Click OK to insert the image.
Sending a mass mailing through CiviMail
Using the Mailings functionality offered by CiviMail provides many benefits over the "Send an email" action, allowing you to track respondents to your mailing, process bounces and allow people to unsubscribe from your mailings.
There are two ways to select the recipients for your mailing.
- If you are sending mail to an existing group, go to Mailings > New Mailing. From this screen you can choose the groups you want to send the mailing to. You can also choose to exclude contacts who are members of another group or contacts who have received previous mailings.
- Perform a search (for example, using the advanced search) and then choose "Schedule/Send a Mass Mailing" from the – actions – drop down. You will be redirected to the New Mailing screen (step 1), where you have to name the mailing and choose an "Unsubscription group" for your mailing.
Note: Mailings sent to recipients based on a search cannot be reused or saved for editing later.
Because the mailing is using the results of a search to provide the recipient list, specifying an unsubscription group is necessary to manage unsubscriptions to this mailing. If a contact who matches your search results is already unsubscribed from the Unsubscription Group (meaning this group is listed as a past group), that contact will be removed from the recipient lists.
If a contact unsubscribes via the unsubscription link in this mailing, they will be unsubscribed from this group. If they are already in the group, then they will be removed. If the contact is not yet in this group, they will first be added and then marked as removed.
Contacts who are in the Unsubscription Group but do not match your search critera will not be included in the mailing. If you wish to include these contacts please include the relevant group.
The process for sending the mailing then proceeds in 5 steps using 5 consecutive screens. You can move between these screens by using the Next/Previous buttons. You can also at any stage save your mailing by clicking on the Save & Continue Later button (Note: Mass mailings based on searches cannot be edited later).
Step 1: Select recipients
This screen contains several options:
- Name your mailing: Enter a name for this mailing. Select a name that will allow you and others in your organization to clearly identify the purpose of this mailing. It is recommended that you start each name with a date (e.g. "08/15/10 monthly newsletter"). This will make it easier to include or exclude recipients of this mailing in future mailings. This name is for internal use only and will not be shown to recipients. You will be asked to enter the Subject of the email later.
- Mailing recipients: In this area you can choose who will recieve the mailing. Mailing recipients can be defined by a group or by a recipients to a previous mailing. You can refine your recipient list by excluding groups or recipients of a previous mailing.
For instance, you may want to resend an email only to contacts that have been added to a mailing list since the last time you an email to avoid sending the same email twice to some people. In that case, choose the same group for recipients as in the original mailing but add the mailing to the EXCLUDE Recipients of These Mailing(s) area. This will then send them message only to those member of the group who did not receive the excluded mailing.
You will see the final number of recipients on the next screen after you click on the Next button.
Step 2: Track and Respond
This step of the process offers options for Tracking and Responding. You can set the following options.
Tracking
- Track Click-throughs: This option will keep track of how many users and which users clicked on all the links in your message. This is accomplished by redirecting all links through your server. This means that all links will be overwritten with custom links containing your domain name.
Note for HTML mail: Some phishing filters may mark links that are displayed differently in HTML code and in the text as unsafe. It is therefore best not to use something like <a href="http://google.com">http://Google.com</a> but rather <a href="http://google.com">click here to go to Google</a>.
Note for Plain Text email: If you use short, user-frienly URLs in your email, they will all be overwritten with long links containing the name of your site and a long code looking like this http://yoursite.com/sites/all/modules/civicrm/extern/url.php?u=529&qid=29011.
- Track Opens: This option allows you to track how many people opened the email you received. However, there are limitations to the effectiveness of this method. See Set-up section for details.
Responding
- Track Replies: Checking this option will send replies from the mailing's recipients to CiviCRM rather than the person specified as sender. Checking this box will open other options.
- Forward Replies: This option is only visible if Track replies is checked. You will need this option if you want the email specified as sender to also receive the replies sent by recipients.
- Auto-respond to Replies: This option allows you to send a specific automatic reply to anybody who replies to your mailing. You need to set up an autoresponder ahead of time in Administer > CiviMail > Headers, Footers, and Automated Messages.
Online Publication
This option makes it possible to make the contents of the email accessible to users as a web page. This option is only relevant if you insert the Mailing permalink token ({mailing.viewUrl}) in your message in the next step. This token generates a URL on which the message can be viewed (remember to insert the code in the appropriate HTML tags).
You have two options to specify the visibility of the mailing:
- "public pages" will make the content of this mailing be viewable as a web page by everyone who has the permission of "view public CiviMail content"
- "user and user admin" only means that only users that received the mailing or administrators can view the content of this email as a web page; the recipients will have to log in to be able to view the message
Step 3: Mailing Content
This section will allow you to compose content for your mailing. If you have templates defined, you can choose one to use for this email. Selecting a template populates the text content and HTML content fields with the message content from the particular template you have chosen. You can then edit that content. You can also update the template, either changing the original template or saving it as a new template.
- As you write your content, remember that every email will be sent individually. CiviCRM offers the ability to personalize each email using tokens. See "Using tokens in emails" later in this chapter.
- If you just wish to send a text version of your email, ignore the HTML section and click on the Plain Text section. Enter your message in the box. You can also use tokens in the text version of the message. There is also a token link at the top right of the Text box.
- Choose a Mailing Header and Mailing Footer. You can have additional Headers and Footers defined via Administer > CiviMail > Headers, Footers, and Automated Messages (See Set-up for details).
Note: The message editing text area displays all text as Arial. However, the actual default is Times New Roman. You should change all text to your target font at the very end because future text edits often revert to Times New Roman.
Step 4: Test
You can test your message in one of two ways:
- Test mailing: You can specify an individual email address or a test group for your test mailing. The test mailing will fill in all the Tokens and include any attachments you are planning to send
It is a good idea to test your email by sending it your yourself and viewing it in your email client to make sure it looks as you expect. If you are sending a mail with a complex layout, send it to your test group and verify it from various mail clients. It is preferable to have more than one person receive your test email and give you feedback.
- Preview mailing: The preview will show you all the HTML formating and converted tokens with your data. It will not include the attachment. It cannot be guarateed that all email clients will display the email exactly as it is shown in this preview but it is useful to ensure things like font consistency, basic layout and color.
Step 5: Schedule or Send
This section will allow you to either send the email immediately or schedule a day and time for it to be sent. By default, CiviMail checks every 15 minutes whether an email is ready to be sent, so there can be a delay of up to 15 minutes after you request the email to be sent.
Mailings sent to large numbers of recipients are sent in batches of about 400 to avoid the emails being caught up by spam filters. Therefore the actual sending of your mass mailing can take several hours depending on your server configuration.
Tracking sent mass mailings
To review key statistics about the To see these statistics, click on Mailings > Scheduled and Sent Mailings, find your mailing, and click on Report. This will show information about all the tracked actions including Bounces. See Managing bounces below.
Also, when the mass mailing is sent to recipients, an Activity "Bulk Email" is recorded under their Activities tab. To see the activity that was just recorded of the email sent, click the Activities tab of the different contacts.
Managing mass mailings
Mass mailings can be found in one of three areas accessible via the Mailings menu:
- Draft and Unscheduled Mailings: As soon as you name your message in Step 1 and click Next, it is placed in this area. If you click Save and Continue Later or simply abandon a message after some steps, you can continue working on it by clicking on the "Continue" link next to the message listed here (Note: Mailings started based on search results will not have the Continue link listed).
You can also delete draft messages here.
- Scheduled and Sent Mailings: When you send or schedule a mailing, it will be placed in this area and remain there until it is archived or deleted.
You can track the success of delivery by clicking on the Report link next to the message.
You can also start another mailing based on a previous mailing by clicking on the Re-Use link.
The Archive and Delete links are available under the More link.
- Archived Mailings: This area lists all messages that were archived from the Scheduled and Sent mailings area. Mailings listed in here are not available to be included or excluded from the recipient list.
It provides exactly same functionality including the possibility to view Reports and Re-Use.
Using tokens in emails
You can use tokens to insert personalised text, such as a person's name, into a mailing sent with CiviCRM. Tokens are replaced by the appropriate value at the time the email is sent out.
For instance, if you want each email to address the person after "Dear " you would type the space and then click on the Token link at the top left of the HTML box. The popup that appears enables you to find the appropriate token. Start typing "First name" in the box and choose the token that corresponds. Click Close and you will see that your message now reads "Dear {firstname}". When the email is sent the appropriate first name will be inserted into each message.
To view the list of available contact tokens, click on the Token link. Tokens for the display name and email greeting are particularly useful.
Only contact fields and actions can be inserted in your email as tokens. Related records, such as the name of the event for which the contacts have pending enrollments, cannot be included. However, you could provide a link to the person's contact dashboard so that they can review their registration details for themselves (once logged in). You can also use a checksum token that generates a unique URL for each contact so they can modify their information without having to login.
In the HTML format editing area, tokens that generate URLs (links) need to be placed in the URL field of the Link creation screen. Otherwise, they will display as text an not a clickable link in the email client of the recipient.
See Tokens and Mail Merge chapter in the Working with Your Data section.
Managing bounces and contacts with invalid emails
If your server is set up to process bounces, contacts will be marked as On Hold when their email bounces. Further messages to those addresses will be suppressed. You can search for emails that are on hold either from the Bounces report or with an advanced search, and then investigate why the emails are bouncing.
You should check the report of each mailing several hours after sending it to review a list of bounces by clicking on the Bounces link. You can see the reasons for individual bounces such as incorrect email addresses (e.g. contact@gooogle.com), fix them and remove their On Hold status. You can then re-use the mailing and simply add it to the EXCLUDE Recipients of These Mailing(s) list on the Select Recipients screen of the re-used mailing setup.
REPORTS AND ANALYSIS
CiviMail has a number of tools for reporting and analysis, indeed reporting is one of the key reasons to use CiviMail.
Individual mail reports
You can view a report for each individual mailing from the scheduled and sent mailings screen. These reports are based on live information about your data you should feel free to track your emails in real time on this screen by refreshing the page. Each mailing report is broken down into a few sections.
Delivery summary
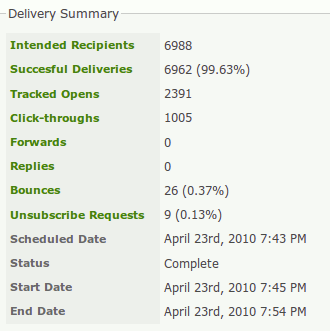
The delivery summary shows some high level statistics about the mailing.
Intended recipients shows the number of people that the mailing was intended to be sent to. Clicking on Intended recipients will show each of the contacts.
Tracked opens shows the number of people that CiviCRM 'thinks' have opened the email. In the world of email, there is no 100% reliable way of knowing when someone has opened an email. CiviCRM uses a trick that is common amongst mass mailers – it embeds a small image with a unique name in each email. When a client views the email and downloads the image, CiviCRM knows that they have read the email. Because this technique is common, to protect people's privacy, most email clients ask users to confirm whether they want to download images in emails. Hence you'll only get an accurate picture of how many people have opened your email if they all choose to download pictures. Because this never happens in practice, tracked opens statistics should be taken as indicative, rather than accurate.
Click throughs shows the total number of times that people have clicked links in email.Forwards show the amount of times people have forwarded the email using the forward link which is a token that you can include in your mailing. Replies shows the number of times that people have replied to the email if you have enabled reply tracking. Bounces show the number of email addresses that could not be successfully delivered to if you have enabled bounce processing. Unsubscribe requests shows the amount of people that have clicked on any unsubscribe links that you include in your email.
Click through summary
In this section, click through statistics are shown for each link. There are two statistics,Clicks (i.e. the number of times that a link has been clicked) and Unique clicks (i.e. the number of people that have clicked on links).
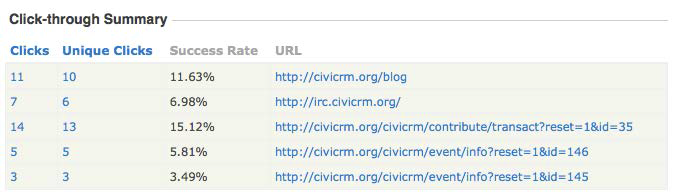
Mailing reports with CiviReport
CiviReport has four reports, Bounce, Summary, Clickthroughs and Opens, which offer similar functionality to what is described above. The major advantages of looking at the reports via CiviReport are that:
- you can run the reports amongst multiple mailings
- you have access to all the other cool features of CiviReport, including the ability to add reports to dashboards, get reports emailed, etc.
Read the CiviReport section for more information on CiviReport.